HOME ABOUTINTERIORSRECIPESBEAUTYPRINTABLESTUTORIALS SHOPFEATURED
Showing posts with label recipes. Show all posts

HOLIDAY CARDS AND CARAMEL SAUCE

Last week was a bit of a Christmas prep blur. But I wanted to share our Holiday cards and neighbor/co-worker gifts with you this year. We always do our little gifts in a jar- this year it was caramel. And this recipe was not only easy but super fast to make, so if you are scrambling for something to make, look no further.


Ingredients:
1 cup butter
1 cup sugar
1 cup dark karo syrup
1 can sweetened condensed milk
1 tsp vanilla

Directions:
melt butter, sugar, and syrup, bring to boil. Boil for 4 minutes without stirring, then remove from heat.
Stir in 1 can sweetened condensed milk and the vanilla. Let cool for a bit before pouring into jars.

Makes enough to fill 4 half pint jars

After many requests here it is folks our 2013 Christmas year in review card.


GARDEN VEGGIE OMELETTE BAKE RECIPE

If you haven't entered the giveaway you still have time, read here.
With the holiday's around the corner we have been searching for some quick easy meals we can feed our guests. Specifically, breakfast. We never eat breakfast, outside of protein shakes, so finding something filling that wasn't pancakes or waffles was a must. John had been wanting to try baking an omelette, and while I usually fear his made up recipes, (chili and olives anyone) I thought this one might actually turn out alright. And it was beyond alright. So good. Can I get seconds please? I have to emphasize that this was John's brainchild, and he did all the work, because he didn't want to give up the animation rights to this recipe.


Ingredients:
6-8 eggs
3 cups spinach, wilted
1 bunch green onions, chopped
1 medium red pepper. chopped
1/2 cup shredded cheddar cheese
salt and pepper to taste

Directions:
Preheat oven to 350. Wilt the spinach in a skillet. Scramble the eggs. Chop the veggies, and stir into the eggs with the spinach and cheese. Grease glass baking dish, and pour in egg mixture. Bake for 20-25 min. Serves 4-6


WHITE CHICKEN CHILI RECIPE

As promised here is the chili recipe we are obsessed with. It's our family's Halloween tradition to make chili before trick-or-treating. Since we are a bit too old for the trick-or-treating part, we decided that we would just keep the chili part of the tradition alive. So add this to your list of must try Fall dishes!


Ingredients:
2 cups cooked diced chicken
1 medium onion, chopped
1 1/2 tsp garlic powder
1 TB Vegetable oil (used to cook chicken if needed)
2 cans (15 1/2 oz) Great Northern Beans (rinsed)
1 can (14 1/2 oz) Chicken Broth
2 cans (4 oz) chopped green chilis
1 tsp of each: salt, cumin, oregano
1/2 tsp pepper
1/4 tsp cayenne pepper
1 cup greek yogurt (you could also use sour cream)
1/2 cup whipping cream

Directions:
In crockpot place cooked chicken, onion, garlic powder, beans, broth, chilies and seasonings. Heat thoroughly. (3-4 hours on low) Or bring to boil over stove, simmer uncovered for at least 30 min.

Remove from heat, add yogurt and whipping cream. Serve immediately.

HOMEMADE MARINARA FROM FRESH TOMATOES

One of my favorite parts off Autumn is harvesting our garden. We had some early frost warnings so a lot of our tomatoes were picked early, most were still green. I tried letting them ripen up in a bowl last year, but learned they do better in boxes and paper bags. So this year we corrected our error, and had a bounty of tomatoes all at once. We diced some for salads, made a round of Ketchup, and ate tomato-filled foods for a week- I am surprised I haven't turned into a tomato, seriously like Violet Beauregarde from Willy Wonka turning into a blueberry.

But we still had 7 huge tomatoes left and they were on the brink of getting too soft. Usually if something was about to rot, I would throw it in the worm composting bin but we stopped feeding them so we could transition them to winter. (More on that next week)   I couldn't stand wasting them, and I wasn't about to dive into the deep abyss really homemaker-ey moms call vegetable canning, NO, not over 7 measly tomatoes. Long story short, I made this marinara sauce, and it was so good, beyond good even. You can actually taste the flavors, it was so easy that I will never buy the canned stuff again. Seriously, your mouth is gonna be like, WHAT?!


Ingredients
6-8 large tomatoes, chopped
2 small onions, diced
1 clove of garlic, diced
1/2 T fresh basil
1/2 T fresh thyme
1/2 T fresh oregano
salt and pepper to taste


Directions
Chop the onions and garlic and saute in a sauce pan. When those have caramelized stir in  chopped tomatoes. Incorporate the fresh herbs. Let the sauce simmer stirring occasionally, the water from the tomatoes will cook off and you will be left with a thick, hearty sauce.

CREAMY CILANTRO LIME DRESSING

This is a super simple, homemade cilantro dressing that we like to add to tacos, or Southwest style salad. I've seen a few variations online but most called for mayo and a packet of processed Ranch dressing mix. We like to keep things pretty basic around here- so I started making homemade ranch mix in a decent sized batch a while ago, you can safely store it for about 3 months. And as a general rule if a recipe calls for mayo, I always substitute Greek yogurt, it cuts down on fat and has a fair amount of protein, its win, win! I've included the dressing recipe, and the homemade ranch dressing mix as well, but be warned that you will become addicted!


Ingredients
3/4 cup cilantro chopped, no stems
1 cup plain Greek yogurt
1/2 cup milk
juice of 1 lime
2 Tbs homemade ranch dressing mix (recipe below)
1 Tbs salsa, or green chilies

Directions:
Puree all ingredients in a blender or food processor until smooth.
Taste and adjust seasonings if necessary, if you want more heat add more salsa or chilies. I like mine mild.


Homemade Ranch Mix

Ingredients:
2 Tbsp. dried parsley
1 1/2 tsp. dried dill weed
2 tsp. garlic powder
2 tsp. onion powder
2 tsp. dried onion flakes
1 tsp. ground black pepper
1 tsp. dried chives
1 tsp. salt


Whisk all ingredients together until blended. If you want a more finely-ground seasoning mix, you can pulse the mixture in a food processor until it reaches your desired consistency.

To Make Ranch Dressing: Combine 1 Tbsp. seasoning mix with 1/3 cup Greek yogurt and 1/3 cup milk, and whisk to combine.

MUSHROOM BROCCOLI AND RED PEPPER MELTS

I hope everyone had a fun Father's Day. We made this recipe as part of the "5 week vegetarian challenge" and again on Father's Day with some homemade sweet potato fries. (Recipe coming soon) I enjoyed seeing the look on John's face when he thought I was preheating the oven on to 500 degrees in the middle of June. His exact words were, "I always wondered what broil meant." I hope you enjoy. It's pretty good.

Ingredients:
1 head broccoli, cut into small florets
1 tablespoon olive oil
salt and ground pepper
8 brown button mushrooms, or your favorite variety
1 red bell pepper
balsamic vinegar
4 thick slices of focaccia or ciabatta bread
4 ounces Gouda cheese, thinly sliced


Directions:
Heat broiler, with rack set 4 inches from heat. Slice mushrooms and peppers, cut up broccoli into florets  Saute veggies with olive oil for about 6-8 min.

Place bread on a work surface. Dividing evenly, drizzle with balsamic, and top with vegetables, then cheese. Place on baking sheet, and broil until cheese is melted and lightly browned, 2 to 4 minutes.


5 WEEK VEGETARIAN CHALLENGE MEAL PLAN

We did it! We completed the vegetarian challenge, without breaking a sweat. I am so excited to share with you the meal plan and some recipes. For a printable version of the meal plan click here. It wasn't as hard as I had anticipated, and I only anticipated it being difficult because we would have to come up with a lot of new recipes for variety. But as soon as it began I welcomed the challenge. I really enjoyed trying new things, like making risotto for the first time. And I can tell you I feel better- not just because I know I was kinder to the environment- but because I feel like I have more energy, because I had fun cooking, and because I enjoyed not having to stress over "what's for dinner." We will probably keep this up for quite a bit. I plan to make a 5 week meal plan for each of the four seasons, so I always have recipes with seasonal fruits and veggies handy. For now we are happy flexitarians.

To make it easier for readers I tagged all of the recipe posts with the label "5 week vegetarian challenge" and you can find most of these recipes by clicking here. You can see the term "leftovers" in the meal plan, I set it up this way for 2 reasons. The first being, if we had leftovers they got eaten, and the second reason was to offer a "free space" each week. For example, if a social engagement came up on a Monday and we were scheduled to make the Grilled Portobello Sandwiches, we would just swap that day with the leftover day from that week. The same goes for "salad," I stuck that in to help us eat the rest of the raw veggies we usually have lying around. We eat a large veggie salad at least once a week anyway, so that really worked for us.

BASIC RISOTTO WITH CAULIFLOWER

I was a risotto virgin before we made this recipe- John had made it before, and I had indulged in some great varieties at restaurants. But I had been wanting to try my hand at making risotto, and our five-week vegetarian challenge gave me the best excuse. I adapted this recipe from this Simple Risotto recipe found here. If you need a basic risotto recipe that you can add mushrooms or other veggies to, this one makes a great base. I was surprised at how well this recipe turned out considering everything I had ever heard about making your own risotto.


Ingredients:
1 head cauliflower
2 tablespoons olive oil
1/2 teaspoon salt
7 cups vegetable broth (you could probably make this work with 6 cups if you had to)
2.5 tablespoons butter
1 large shallot, diced
3/4 cup dry white wine
1.5 cups Arborio rice
2 to 4 cups spinach leaves
1 cup parmesan cheese
1/2 tsp salt
 pepper to taste

Image 1 shows the first 1/2 cup of broth being added. Image 2 is what your rice will look like while it is absorbing the broth. Image 3 shows the creamy consistency once the rice is cooked and you no longer need to add any liquid. Image 4 is the final product.


Directions:
Preheat the oven to 450°F.
Place broth in a medium sauce pan and heat to a simmer; reduce heat and keep warm.
Cut the cauliflower into medium small florets. Toss the cauliflower, olive oil,and 1/2 teaspoon of salt in a bowl. Place cauliflower on a parchment lined baking sheet and roast for 30 minutes in the oven. You can stir them about halfway through baking. When they are tender and slightly browned they are done.

While the cauliflower is roasting, mince the shallot. In a large skillet add the shallot, butter, and 1/2 teaspoon salt, and heat to medium high. Once the butter is simmering, reduce heat to medium, and cook until the shalot is translucent.  Stir in the rice, coating it with the butter mixture.  Now you can increase the heat to medium-high and leave it there for the duration of the cooking process. Refer to the images above when adding your liquids.

Add  the white wine, I like to use Sauvignon Blanc when cooking. Stir the wine and rice constantly until liquid is almost evaporated. At this point, you can start adding the broth. Add the broth in 1/2 cup increments, and stir frequently until broth is almost absorbed. Repeat until rice is tender, but still al dente, you shouldn't let the rice absorb all of the water once it is ready because you want to have a bit of "sauce" left.

Stir in the parmesan cheese, and the cauliflower. We added spinach leaves because we had them, but you could also substitute kale or mustard greens. Keep stirring the ingredients until they are all incorporated and your greens have begun to wilt. Remove from the heat and season to taste.

PORTOBELLO SANDWICH WITH TZATZIKI

We made this recipe on Sunday, because we had some leftover tzatziki sauce and I was worried it was going to go bad. Being on our 5 week vegetarian challenge has made us a lot more creative in the kitchen, and has really gotten us out of our usual dinner rut. I can't wait to share the whole meal plan with you- only two weeks left! What has probably surprised me the most on this menu is how we don't really miss some of the old meat dishes we usually ate. I was sure I'd be craving a burger by week three, but this sandwich rivals some of the best burgers I have ever eaten!


Grilled Portobello Sandwiches

Ingredients
2 portobello mushrooms
2 tablespoons aged balsamic vinegar (I love Nappa Valley Naturals brand)
2 tablespoons olive oil
Focaccia bread
Tzatziki sauce (see below)
1 Red onion
4 oz Feta crumbles


Directions

Preheat your grill to medium-high heat. (We don't have a real adult grill so I did this on the George Foreman, which is what we use for paninis as well).

Lightly drizzle your mushrooms with olive oil. I also used balsamic vinegar because I have been putting it on almost everything lately, and it makes the flavors really stand out. Brush on for an even coat and let marinate.

Make the tzatziki sauce, see below, then slice the onion.

Grill the mushrooms for 4-5 minutes on each side.

Slice the focaccia bread, and drizzle a bit of balsamic. Add a dollup of tzatziki, and layer on some onions. Cut the mushrooms in half, and lay one of the halves on each sandwich. Then add the feta crumbles, and the other half of bread. Serves 4


Tzatziki Sauce

Ingredients
1 cup plain Greek yogurt
1 cup diced cucumber
1/4 cup fresh dill – minced
1/8 cup lemon juice
1 garlic cloves – roasted
1/4 teaspoon salt
1/8 teaspoon pepper

Directions
Combine all ingredients in a medium bowl check for seasoning. Add more dill, lemon, garlic or salt/pepper if you wish! Serve immediately or store in the refrigerator for up to 5 days.

TOASTED GOUDA QUESADILLAS

Our Vegetarian quest continues. This recipe is primarily why I couldn't be a vegan- I have pretty much given up dairy except for cheese, its my food weakness. You can't make a tasty quesadilla without cheese. We had family from Germany visiting us last week, one evening for dinner we had a great cheese plate- but so much smoked gouda left over. John is a master of throwing together a bunch of crazy things and having them turn out great. (With the exception of the spinach olive chili- I know you just gagged- I gave him props for trying, and I also never let him forget how great the chili was once I picked out the spinach and olives!) So this tasty recipe was all on him. And by all on him I mean- he invented it, and got it all over his white T-shirt.


Ingredients:
2 tablespoons olive oil
1 1/2 large onions (white or yellow)
1 1/2 tablespoons water
1/2 cup barbecue sauce
6 ounces smoked Gouda cheese
1/4 cup chopped cilantro
1/4 cup Italian parsley
4 flour tortillas

Directions:
Slice the onions. Chop the cilantro and parsley. Grate the cheese.  In a large nonstick skillet, heat the olive oil, and add sliced onions. Saute for about 5 minutes, until soft. Add barbecue sauce and water; stir until the onions are completely coated. Turn off heat.

Spread onion mixture, cheese, and greens on half of each tortilla, and then fold in over, this way you can toast 2 at once. Place the quesadillas back in the skillet.  Cook until toasted and the cheese is melted, about 3 minutes per side. Cut quesadillas in half, and serve. I added a bit of avocado to mine, and John added hot sauce and salsa. We both loved them!


QUINOA AVOCADO CHICKPEA SALAD

John and I decided to try out being vegetarians for a few weeks. Because we do our grocery shopping one day per week now, I decided to make a simple meal plan. That way we could make multiple dishes, with similar ingredients, so fresh fruits and veggies wouldn't go bad before we could get to the market again. (We live a block away, and tended to go everyday- which is great for having fresh food- but we wasted so much time!) This week we had dishes that included tomatoes, cilantro and basil. We created a 5 week plan, so I'll share a few recipes from each week, and at the end of the plan I'll share a printable file of the plan so you can try it out too! Last night's dish was this salad, it was filling and I loved how the lemon dressing brought out all of the flavors of the veggies.


Ingredients:
1/2 cup dry quinoa
2 cups water
1 can chickpeas, rinsed
1 cup cherry tomatoes cut in half
2 avocados diced
2 cups spinach
1 bunch cilantro
1/4 cup onion
2 small cloves garlic

For the dressing:
1/3 cup lemon juice
2 tsp. mustard
1 tsp. agave nectar or similar sweetner
2 tsp. olive oil
1/2 tsp. cumin
salt and pepper to taste


Directions:
1. Make your quinoa first. Add quinoa to the water and turn on the heat to medium high.  Let the quinoa come to a boil, then reduce heat to medium and allow to simmer. Cook quinoa for about 15-20 minutes, until the water is absorbed.  Remove it from the heat, but keep the lid on.  Set it aside.

2. Finely chop your spinach and cilantro. Add the greens to a bowl, and set aside.

3.  Next take your onion and garlic and finely dice those, and add to the greens mixture. Next add your chickpeas and diced tomatoes.

4. Dice your avocados, and add them to the bowl. I like to cut the avocado in half, remove the pit and slice them while they are in the skin (it's a lot less messy). Then stir in quinoa, and mix all of the salad ingredients.

5. Make your dressing by whisking all the ingredients together. Pour over salad, and mix until combined. I like to put it in the refrigerator for about 10 min. I think it tastes better slightly chilled.


ROASTED BRUSSLES SPROUTS

I was craving brussels sprouts this weekend, which isn't a phenomenon I am accustomed to- So I picked some up at the market thinking I would try roasting them so the leaves crisp up like my kale chips. I was going blind here just hoping this was going to work- It must have been a long week because I didn't even think to Google "recipe for roasting brussels sprouts."  It took a little guessing on the time but I think I got it just right at 20 min. with a turn of the sprouts halfway through.  They taste so good this way, if you aren't a sprout fan you should really give them a second try. I'm hooked.


Ingredients
1 1/4 lbs brussels sprouts
2 teaspoons extra virgin olive oil
Salt and pepper to taste

Directions:
Preheat oven to 450 degrees F.
Trim and halve sprouts. In a bowl toss sprouts, 2 teaspoons oil, and 1/4 teaspoon each salt and freshly ground black pepper to evenly coat. Place on an aluminum foil or parchment lined jelly-roll pan, roast 10 minutes, then turn them, and roast for 10 more min.

BUFFALO CHICKEN MEATLOAF (PALEO)

I thought I should share this recipe because I make it nearly every weekend as a great protein boost for the days we workout. We don't eat a lot of meat in our diet, but we aren't vegetarians by any means. Sometimes I make it with diced up chicken breasts and sometimes I make it with ground chicken. I almost prefer the diced whole breasts because I can get hormone free, free range, farm raised, etc. Sometimes with the ground meat you don't know what goes in there. This recipe is 100% paleo for those of you sticking to that lifestyle.


Buffalo Chicken Meatloaf
Serves: 2-4

Ingredients
1.5 lbs. ground chicken
2 egg
6 tablespoons coconut flour or ½ cup almond flour/meal (I used coconut flour because it is cheaper)
3-4 tablespoons hot sauce
3 stalks of celery, diced
1 small yellow onion, diced
1 teaspoon garlic powder
½ teaspoon cayenne pepper
¼ teaspoon celery salt
salt and pepper, to taste

Instructions
Preheat oven to 375 degrees.
Place all ingredients in a bowl and mix thoroughly.
Put mixture into one large loaf pan.

Bake for 35 or until chicken is completely cooked.


TORTELLINI SOUP

I'm a huge advocate of eating soup in the winter, its easy, its affordable, and best of all it warms you up! We have been loving this simple tortellini soup recipe, because you can toss any savory veggies you have on hand right in and it always tastes great. I have made it on the stove or in the crock pot, its so easy and will impress any dinner guests. I have to give photo credit to Savoring the Thyme because we ate all of our soup before I could take a photo, hey sometimes you just forget you are documenting your whole life on the internet... it happens.


Tortellini Soup

Ingredients:
2 celery stalks, chopped
3/4 cup sweet onion, chopped
2 large cloves garlic, chopped
3 spring fresh thyme
1 (15 oz.) can organic diced tomatoes and juice
4 cups low-sodium vegetable broth
10 oz. fresh tortellini
a handful of fresh parsley or spinach
Salt and pepper, to taste

Directions:
In a large pot saute celery for about 3 minutes, stirring often, Add the onion and cook for 3 minutes before adding the garlic and cook for another minute. (You could also add corn, or carrots to the soup if you have them on hand)

Add the thyme, tomatoes and broth and bring all to a boil. Add the tortellini to the pot and cook according to the manufacturer package directions. Remove the soup from the heat, mix in your parsley or spinach (I usually use parsley because I have an aversion to cooked spinach) Finally, season with salt and pepper if necessary. Makes 4 large servings. 

TOFFEE BLONDIES IN A JAR

This year for our neighbor and co-worker gifts we decided to give "cookies in a jar." We thought people bake so much during the holiday and have so many treats hanging around that giving something that they could make later with their kids or have on hand for a snowy day would be fun. I found several ideas online but not many had rave reviews in the taste department, just cute packaging. Because I had my own packaging idea we decided to find something that would taste great first and foremost. I stumbled upon this idea for Toffee Blondies from Better Homes and Gardens.


To assemble them you need the following ingredients:
1 qt. Mason Jar
1 cup brown sugar
1/2 cup mini chocolate chips
1 cup flour
1 teaspoon baking powder
1/4 teaspoon salt
3/4 cup chopped pecans or walnuts
1/2 cup Heath Chips

I like to put the brown sugar at the top of the jar because if it hardens it is a pain to get out of the bottom of the jar, but they can be layered in any order you want.

Your recipient will add the following ingredients and follow these directions:
1/4 cup melted butter
2 lightly beaten eggs
1 teaspoon vanilla

Preheat oven to 350. Melt some butter in a bowl.  Whisk in the eggs and vanilla. Pour in the contents of the jar. Mix it all up. Pour the batter in an 8x8x2 pan coated with cooking spray. Bake  for 25 to 30 m. or until the blondies start to pull away from the sides of the pan.  Cool in the pan and cut into 16 bars.

To make our cute tags we found these great free printable ones from Hey Look. And I customized the recipe cards to print on the back of one of their tags. Feel free to use this file for your own gifts.


HEALTHY PEANUT BUTTER COOKIES

Loving these peanut butter cookies and only 36 calories per cookie! You can't beat that, they are even better if you make your peanut butter from scratch. Enjoy!


Ingredients:
1 Cup Peanut butter
1 Cup Sugar
1 TSP baking soda
1 egg

 Mix the peanut butter and sugar first then add in the egg and baking soda. Bake for 10 minutes on a lightly greased cookie sheet at 350 degrees.

CROCK-POT BROWNIES

I am a bit of a slow cooker fanatic. I don't have a lot of time in the evenings, but I don't like to compromise on healthy eating, so I tend to just throw everything in when I leave for work and it's done by the time I get home. So you bet your bottom dollar when I saw this brownie recipe on The Gracious Pantry for slow cooker brownies, I was all over that! It's a pretty simple recipe, and it's clean eatin' my friend- which makes them even more delicious. For instructions on how to prepare click on over to The Gracious Pantry. Enjoy!

Slow Cooker Brownies
(Makes 32 brownies)

Ingredients
1 cup whole wheat pastry flour
½ cup cocoa powder, unsweetened
1-1/2 teaspoon baking powder
½ cup apple sauce, unsweetened
2 medium, ripe bananas, mashed
1 cup honey
4 egg whites
6 ounces unsweetened Baker’s Chocolate (6 squares)
1 tablespoon coconut oil
½ cup walnuts (optional)
Olive oil in an oil sprayer


Calories: 89
Total Fat: 3 g
Saturated Fat: 2 g
Trans Fat: 0 g
Cholesterol: 0 mg
Sodium: 30 mg
Carbohydrates: 16 g
Dietary Fiber: 2 g
Sugars: 10 g
Protein: 2 g

MUFFIN FOR ONE

 Have you ever wanted just one chocolate chip cookie, or just one muffin? Then this post id for you! I found this great recipe for a single muffin on one of my favorite foodie blogs, Rabbit Food for My Bunny Teeth.
Not only is it tasty it has one of my all time favorite ingredients, Chobani yogurt! I basically eat one everyday for lunch, I could never be a true vegan because this yogurt exists, I wish I was kidding!


Ingredients:
4 Tbsp Chobani Vanilla Chocolate Chunk Greek Yogurt
3 Tbsp whole wheat flour
1 Tbsp liquid egg whites
1 Tbsp chia seeds
1/2 tsp pure vanilla extract
1/4 tsp or 1 packet of stevia
1/4 tsp baking powder

Directions:
Preheat oven to 375 degrees. Combine all ingredients and stir until well mixed. Pour the batter into a cupcake liner in a muffin tin. Bake for 15 minutes. Remove from oven and let cool for 5-10 minutes. Enjoy warm out of the oven.
Note: This recipe would also work great with other Chobani flavors such s cherry or blueberry where there are chunks of real fruit!


HOMEMADE PESTO


This weekend we harvested our first vegetables from that garden! We have been picking lettuce for a while, but this week our peas and tomatoes were finally ripe enough to pick. The whole garden has gotten quite out of control, so we had to cut back a few things, including our basil plants. We couldn't eat the basil fast enough, and it's like Medusa, you cut one stem and 2 grow back in its place. So, I decided we would make pesto.Which would go amazingly with this 
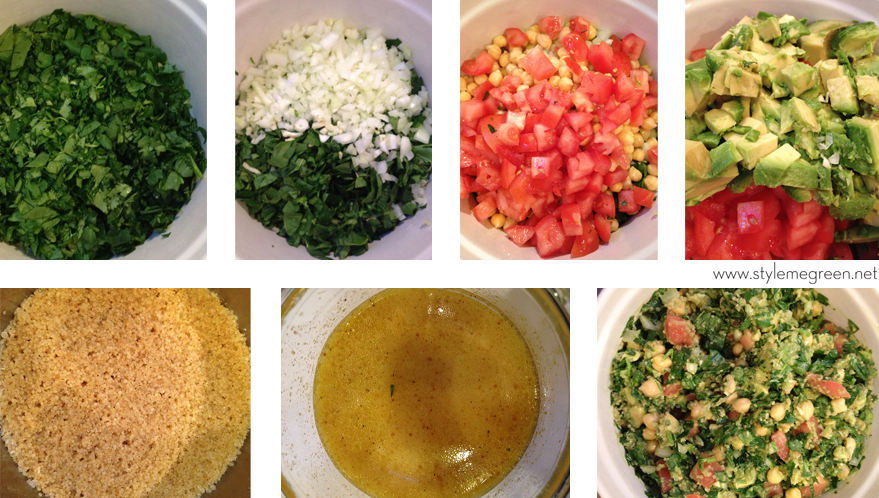
recipe. Check out our out of control veggies below.

The tomato plants are taller than I am. Isn't it Miley Cyrus who sings "I can't be caged?" I'm pretty sure that's how the squash feels.


Yields 2.5 cups of fresh pesto

Ingredients

1/2 pound of basil leaves, washed and dried thoroughly
4 oz freshly grated Parmesan cheese
1/4 cup pine nuts
3/4 cups walnut halves
1-1/4 cups extra-virgin olive oil
1/2 tsp salt
1 tablespoon chopped garlic (you can add more if you like garlic but I'm not a huge fan)


Heat walnuts and pinenuts in a dry, heavy skillet over medium heat for 5 to 10 minutes or until they’re golden brown and give off a rich, toasty fragrance. Stir or toss frequently for even toasting. Remove from pan to cool.
Chop the garlic cloves finely, sprinkle a teaspoon of salt on top and mash to a fine paste with a fork.
Place garlic and half of the basil leaves in the bowl of a food processor fitted with a steel blade. Process for 15 seconds.
Add the rest of the basil leaves and with the processor running, slowly pour the olive oil through the feed tube and process until the pesto is thoroughly pureed.
Add the Parmesan cheese and toasted nuts and puree for one more minute.
You can use it the right away. If you’re going to store pesto for a short period of time, place in a jar with a thin film of olive oil on top. You can also divide it into 1-cup portions and store in the freezer for a few months. Make sure to defrost in the refrigerator overnight.

*If you don't have a food processor you can use a good quality blender, just make sure to finely chop everything before hand.  If you want this to be vegan friendly just omit the cheese and use a little less oil.

KALE CHIPS

This weekend we tested out a recipe that I was a little bit leery about. It was homemade kale chips, and it seems like everyone is making them these days. I have a serious aversion to kale, I am not a fan. I only eat it when I put it in vegetable juice and it is hidden behind notes of carrot and apple. But, I was pleasently surprised. In fact, we devoured these within minutes of making the first batch. And it only cost is $2.00. you can't beat that with a stick, well you probably could, but I wouldn't recommend it. You have to taste these for yourself.


Kale Chips
Serves 3-4

1 bunch kale
1 Tbsp olive oil
1/2 tsp ground salt or seasoning salt to taste

Preheat oven to 350 degrees. Rinse and dry kale leaves. Remove kale leaves from stems. Place the leaves in a mixing bowl and drizzle with olive oil. Massage the kale until the olive oil is evenly coated onto the kale. Place kale directly onto a baking sheet and sprinkle with sea salt or seasoning. Don't cut the Kale or trim it down, the leaves will shrink dramatically in size so they can overlap on the baking sheet. Place the baking sheet in the oven and bake for 10-15 minutes or until crisp, moving the chips around and flipping them half way to ensure that they are evenly baked.

With an oven it is trial and error, you just have to keep checking them to see when they are done. If you have a food dehydrator you could use this recipe and dehydrate at 115° for 8-12 hours.