HOME ABOUTINTERIORSRECIPESBEAUTYPRINTABLESTUTORIALS SHOPFEATURED
Showing posts with label DIY. Show all posts

2014 FREE PRINTABLE CALENDAR

I'm excited to ring in the new year! I usually don't party anymore, but I plan like it's 1999. I love organizing, making color-coated calendars, meal plans, you name it, I plan the hell out of that crap. I saw so many great printable mini-calendars this winter but I couldn't find any 11x17 singe-page designs. I don't give up easily, and the lack of designs inspired me to create my own 2014 calendar- one that you could download and print at home FOR FREE! I hope you all have a great year!

To download click here.


UPDATE: I added a few colors after getting about 30 emails requesting some other hues, and I was happy to oblige. For other colors click these links, yellow, violetblue, sage.


INSTAGRAM HEART PHOTO COLLAGE

Our anniversary was 2 weeks ago. We both agreed we wouldn't spend more than $5 on a gift or a treat for the other person. We usually just go out and enjoy a nice meal to celebrate-This year it was a local Thai/Sushi place- So good- If you are ever in Sun Valley you have to go to Dang's Thai and Sushi Bar. I wanted to give John something that would celebrate the past 7 years, and be simple, he doesn't get into mushy stuff, and I don't really either. Then I saw a picture on Natalie Jean's Instagram of her cute son in front of a photo collage wall in their home. My brain immediately switched gears, how I could make this in my home? I decided on a small framed collage, I already had the frame I just needed the photos.


I researched the best ways to print my instagram photos, and ultimately I came up with the idea of laying out 2x2 images on a 4x6 photo so my local photo center could print them easily for me. I also had about 1,000 pictures on my computer I had taken before instagram was even a twinkle in Facebook's eye- so it was just easier to transfer everything from computer to photo shop.  There are some great apps and websites though if you don't want to go that route.
Pinstagram
Mpix
Foxgram


Supplies:
Exacto knife
Cutting mat
Photos
Acid Free Photo squares
Frame and mounting board

Method:
Once each of my small photos was cut out I began laying them on the mounting board. I tried several different layouts before deciding a heart looked the best, and it felt a little bit more free-spirited than filling the entire frame or having a stiff grid.

Once they layout was set I used my photo squares to stick the photos to the mounting board. Then just frame and hang, and you have it!

I like fat hearts, not tall ones, so I think I may add more photos to widen it at some point when I find the perfect square frame.


The hardest part was deciding which photos would be included, we had so many fun ones. I loved going through them all and finding photos of things we totally forgot about- like the time a Times-Square tourist trap about King Tut lured us, and our $20 with promise of seeing a real mummy. At least we looked good in the gift shop pharaoh hats.


THANKSGIVING PUMPKIN CENTERPIECE

I like to re-use things if you haven't noticed- not in a weird hoarder, crazy cat lady kind of way, but more in a "I saw this idea on pinterest/Martha Stewart, and was like I can totally do that with something I already have" kind of way. This idea came from pinterest, 2 years ago, yeah - I was pinteresting before it was even cool... haha. (I literally overheard that exact statement at the grocery store a few weeks ago, I maybe rolled my eyes so hard they got stuck.) But, I digress- the moral of that story was I'd been filing that idea away so long and this Thanksgiving seemed like the perfect time to let it be free.


You'll Need:
A pumpkin
Flowers
A Vase/jar/container

Method:
Cut the top off of the pumpkin and leave yourself about an 8" diameter hole. Scoop out the insides. Place a small vase or plastic container inside the pumpkin to hold the water for the flowers. Arrange your flowers. 

The whole process ended up taking about 30 minutes. I think I'll end up going back to the floral shop and adding some olive branches and more hydrangea blooms closer to the holiday,for a soft green touch- but I like where it is going. 


PUMPKIN BLING

I have an addiction, unfortunately it's not really treatable, considering it involves painting everything gold. From picture frames, to trays, our house is littered with objects that fell pray to my Midas touch. I even think about what I can paint next. (a pile of pine cones in my office is just screaming for a holiday makeover.) This time it was pumpkins. I wanted to add a little glam to our Thanksgiving table, right now the plan is to head toward a bit of a rustic glamour- but it's all still coming together in my head, and I know it actually wont materialize until moments before the meal.

But not all is lost if we bag the gold pumpkins because I think they make the perfect pre-thanksgiving accessory. I've never been the kind to decorate for Christmas before December begins, so these will hold me over quite nicely until I can get my glittery hands on the pine cone pile. I just wish I painted them sooner. Do you have any DIY addictions?


DIY TEACUP CANDLES (EMERGENCY CANDLES)

I have been a little MIA in the last month because we had a forest fire, it was kind of scary, I won't lie. You can read about it here. I have never had to evacuate my home before, and we had about an hours' notice- let me tell you, you really realize what is important in a crisis. Fortunately, we had our important documents all in the same place, and it was a matter of tossing in medicine and passports. Oh, and John hadn't come home from work yet, so I was doing all of this alone, and as organized as I am- I really almost forgot about the cat... Pet owner of the year right here ladies and gents!

But we made it through, and thankfully everyone and everything was safe. But in the wake of our evacuation I realized we are woefully ill-prepared for other types of emergencies. We had no water/food stores, and didn't even own a proper flashlight that wasn't attached to our phones, until last week. So in addition to my other emergency prep, I wanted to make some emergency candles- but I wanted them to look good.  I had empty teacups just sitting in the cupboard and they needed a purpose in life. So that's how this DIY was born. I would estimate from my previous candle-owning knowledge, that these will burn for close to 40 hours each.


Supplies:
Scissors
Teacups
Soy Candle Wax
Flat Braid Wicks (at least 3" longer than your container)
Microwave Safe Container/ Double Boiler
Hot Glue/ Wax Adhesive


Directions:
1. Clean your cup and dry completely
2. Place your wick in the center of your cup and glue it down with hot glue. You can also use wax adhesive for this step. Support your wick with a pencil/skewer/huge ugly stick. I had a huge ugly stick handy as you can see.
3. Heat wax according to package instructions. This is where you will add dye or scent if you choose to. I added a few drops of lemon and orange scent.
4. Pour into container. You can adjust the wick to make sure it is straight after you poor the wax.
5. Let sit until the wax is cool until the candle is solid. (If you have an uneven settling you can add more wax to the top to make it a level surface.)
6. Trim wick down to 1/4″.


DIY SUNSCREEN RECIPE


After reading a few articles and hearing stories from people about the cancer causing properties of store bought sunscreen, (read here and here)  we decided this summer we would make our own.  I know it's a bit late in the season, but we tested out 4 different ratios of oil to zinc oxide before determining that this was the best one. This recipe shouldn't be the end-all and be-all answer to your sun prevention needs. I usually wear a hat and cover up when I am outside, as well as keeping a diet rich in anti-oxidant foods. That really is the best way to minimize your risk of skin cancer and premature wrinkles, while keeping it all natural. But I think this recipe is a great addition to my normal sun protection tactics, and I could see a difference on days when were were out in the yard gardening.  If you want to substitute some of the oils in the recipe here's a handy chart of natural SPF.


Ingredients: (1 oz = 2 Tbs)
Most of these can be purchased at your local market or health food store,
if not click each ingredient for a link on where to buy online.
1 ounce shea butter
2 ounces beeswax (makes it more waterproof)
1 1/2 ounces coconut oil
1/2 ounce wheat germ oil
1/4 ounce raspberry seed essential oil
1/4 ounce carrot seed essential oil
1 Tablespoon vitamin E oil
1 1/2 Tablespoons zinc oxide powder
1 1/2 Tablespoons liquid aloe vera


Directions:
1. In a double boiler, over low heat, melt the coconut oil, beeswax, and shea butter.
2. Remove from heat and allow to cool slightly prior to adding the vitamin E oil, zinc oxide powder, and essential oils. I poured my mixture into a glass jar to allow it to cool faster.
3. The oils and aloe will incorporate easily, but stir the zinc oxide until it completely dissolves.
4. Then pour  mixture into a push-up or roll-up dispenser, you can get something similar here. You can re-purposed  used deodorant containers for this recipe too.
5. Allow your sunscreen to cool and harden overnight. If you are out in the sun for long periods of time, or swimming reapply often.

Notes:
If you don't need your sunscreen to be waterproof you can use less beeswax. If you aren't going to be using this around water you are probably okay with just 1 oz of beeswax.

SPF numbers are pretty insignificant when it comes to differences in sun protection. SPF 100 blocks 99 percent of UVB rays, while SPF 50 blocks 98 percent. SPF 30 blocks 96.7 percent, SPF 15 blocks 93%.
You'll want an SPF of more than 15 to block UVA and UVB rays, Zinc oxide blocks both UVB,UVA2, and UVA1 rays. More info on UVA and UVB here.

You could easily spend close to $30-$40 for all of the ingredients that you wouldn't already have if you don't make your own beauty product regularly, but you could get 4-5 batches before you'd run out of some ingredients. Keep in mind you can team up with friends and go in on the ingredients together.

FRAMED AGATE COLLECTION

I have been searching for some interesting art ideas for the wall that is weirdly angled between our foyer and living room. We've had a movie poster hanging there since the day we moved in, 48" of Rita Hayworth as Gilda, in all her glory. I've had this poster since high school. (Yes, I was a super interior design geek even then- I felt like N'sync posters and the like cluttered the look of a room, but a framed movie poster was much more sophisticated.) So when we moved to our post-college home I wanted something a little less "teenage dream," and a little more "Hey, I'm a real interior designer, I promise."  But it takes me forever to make design choices in my own home, so this is a huge step for us.

We tend to gravitate toward collections in this home because we have 12' ceilings, which makes for a lot of ground wall to cover- and because collections inspire us. We've always loved going to museums and spending hours in the natural history wings, wandering through the dioramas and gazing at the fossils. When I saw what was hanging over the tub in this showhouse in Utah I knew exactly what we needed for our space. 


Even though John loves agates and geodes, and I love pyrite- we selected agate slices to frame, because they were thin, yet colorful and would add dimension to space. I ordered my agates from Sonya Masur on Etsy.  Check out her shop, she has so many great stones, and her agate coasters were perfect for this project. I tested out one agate in a frame prior to purchasing, because I did not want a shadow box frame.  and they were thin enough to rest against the glass, and still get the back of the frame on, I did have to pop the rubber feet off the back of the coasters, but they came off without a snag.


To complete the look I taped a piece of biscuit colored card stock to the back of my mat, and because I ran out of double stick tape I used a fancy tape loop on the back of the agate. Simple place the agate in the center of the mat and put the frame back together. I used frames from Michael's Craft Store, I also used the same frames for this project. And I stuck with my favorite brand of metallic spray paint, Rustoleum universal metallic - but this time I got the hammered metal, in the rosemary finish, it has a great greenish silver color. It's from Home Depot.


DIY OMBRE T-SHIRT


I am FINALLY getting to some of the DIY projects that have been cluttering up my office. We've had a super busy, fun-filled summer- and between buying a new car, and our summer road trips we finally had an easy weekend at home. This project takes about 15 min. plus running it through the wash. If I had more time I would have boiled my own dye, but I was using this same tub of leftover dye to fix some shirts that got ruined in the wash, so I just used that dye for this project. If you have the time and patience I recommend making your own natural dye, here is a link. 

Supplies:
T-shirt
Dye
Basin/sink
Rubber Gloves
Hanger
Hair Clips


Directions:
1. Follow the instructions for mixing your dye, and be sure to read the safety and cleaning labels because when they say it will dye your sink purple, they don't lie. (Stainless is easier to clean than white porcelain, so line your sink with a wash tub if you are unsure.)
2. I got my t-shirt wet first, and used a chip clip and a hair clip to hold back the sleeves from the dye. Hang your shirt on a hanger and slowly begin to fold it into the dye.
3. Once you have reached the desired height of your color lift your shirt out, you only want the color at the top of the shirt to be submerged for about 1 second.
4. Slowly pull the shirt out, I mentally divided it into 3 parts and let the shirt sit for about 3 min. at each level. At this point I felt like the bottom looked great, but that the line between the white and the first bit of color was too harsh, so I diluted my dye with some water, and I dipped it back in about an inch above my previous line. (it was so much better, so I recommend this technique for blending the color into the white.)
5. Then empty your dye and rinse the shirt until the water runs clear. Make sure you don't let the dye run into the white part of the shirt while rinsing. Hold the shirt with the white on top and let the faucet run through the dye until its clear. (If you have a sprayer on your sink it helps to use this too.)
6. Wash the shirt according to your dye instructions. Be aware that the white part of your shirt will probably get some of the dye run off in the washing machine, but that it's not a lot, or even enough to really worry about, and it helps the shirt look more blended overall, and not like stripes. You can see in the last two images above the shirt before washing and after washing.

FERN COLLECTION FREE PRINTABLES


I have received quite a few emails about where I got the fern botanical prints in my bedroom, from this post. So, I thought I'd address the question with a new post and some free printables! I didn't purchase them anywhere, because I couldn't find ones that fit the frames I already had. Prints that did fit the frames, had a lot of other plants going on, and I just wanted a basic fern, no extra jib jab. So I ended up photoshopping my own prints from old scans I found at an online library archive. Library and museum archives are a great way to get a collection of prints if you are trying to achieve the look of a gallery wall for less, many of them have online scans. You can get my fern collection by clicking here. 


I simply printed them out with a basic color printer and placed them in my frames. I got these frames originally at Michael's craft store about 5 years ago, but they still sell the exact frame in a few sizes. (I have another fun tutorial coming up with these same frames) I believe they were 9.99 -- and they were all 50% off, so wait until they have a sale. I should also mention I spray painted them with my most favorite gold spray paint of all time- nothing compares- really. You can get it here. It looks like this:


DIY PINBOARD


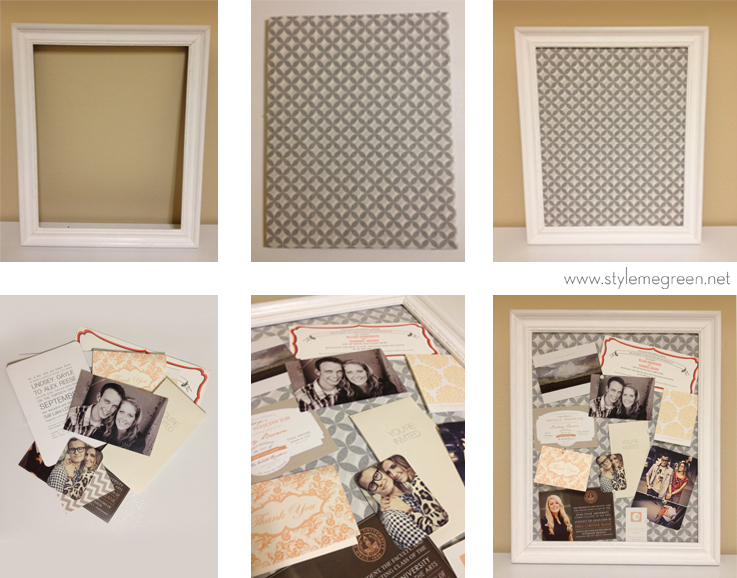
I have a box in my office filled with notes and cards that I like to keep around for inspiration. I find it helpful if I am stumped on the wording to a wedding announcement, need a reminder on a friend's child's birth date, or need an idea for a color palette. You'd be surprised how many small things you can find inspiration in. But first you have to get them out of the box. I have been meaning to make a pin board for a while and finally got around to it on Sunday, while watching the latest Mad Men. It really is that easy, it took about 20 min, excluding painting the frame. So here's how:


Find a great frame with character, I loved this one because it had some great carved details in it. I picked it up a few years ago at good will and it had been waiting for new life. I painted it white with some primer I had on hand but any type of paint will do on wood- prime before you paint plastic or metal.

Then I used an exacto knife to cut a piece of foam core to fit the opening. I had a few fabric remnants on hand and selected a black and white pattern for the inside. It had too much contrast for my taste- so I ended up using the back side of the fabric, which is grey and white.

Just pop the foam core into place. Arrange some cards and letters and pin them on! That's it, I told you so easy. And you can do it on a large or small scale. If you had a large frame you could duct tape your foam boards together to create a larger inspiration palette. I already know I'll be switching out the fabric panel all the time.


DIY CONTAINER HERB GARDEN


It is still a bit to early around here to get our real raised beds planted. I wanted to get our herbs going so that we had as much time as possible for them to mature. I had set aside this old crate I found at an estate sale last year, and it turned out to be the perfect home for our herbs!


I had to line the interior with plastic, because there were spaces in the base of the crate, and I didn't want the wood to rot. I used an industrial sized trash liner, and cut off the excess, so only about 4" of bag hung over the edge. Because my crate had handles I didn't want the level of soil above that, so I folded over the plastic and stapled it to the inside of the crate just below the handle holes. Then all you have to do is fill the bag with soil and plant your herbs. This would also make a great flower bed if you live in an apartment, and don't have a yard. We have one more crate hiding out in the shed, I think it will make a great Mother's Day gift.


HOMEMADE LOTION

Winter is killing me right now, I have Spring fever like you can't imagine. John made fun of me the other day for taking a nap in the sun spot on the floor like a cat, its that bad. I have been trying to find simple ways to help combat the cold-month blues. One was getting my skin ready for spring! I love this simple DIY lotion recipe it only has 2 ingredients and its just about as natural as you can get. Coconut butter is an great moisturizer and promotes elasticity in skin, and extra virgin olive oil is filled with vitamin E. If you can't find coconut butter at your local market here is a great one.


All you have to do is mix two teaspoons of coconut butter and about 8-10 drops of extra virgin olive oil together in a bowl. Just apply a nice even layer anywhere your skin needs that added boost of moisture. I like to give my knees, elbows, and feet just a bit more attention. I like to make it in small amounts so that there isn't a lot left over. If you do have some extra, cover it and pop it in the fridge. (Be sure to label it, I have a whole shelf designated to beauty products in the fridge so John doesn't  accidentally eat my face masque or hair conditioner.)

HOW TO MAKE YOUR OWN CHALKBOARD PAINT

I was at the craft store yesterday and saw a little bottle of chalkboard paint that cost $13.00 --excuse me-- that's more than we pay for Hulu and Netflix each month (aka how I get my Downton Abbey and Bachelor fix) So here I am to share my top secret chalkboard paint recipe with you. I love it because its so easy a child could make it, and you can use ANY color you can contrive! If I can convince John I might just paint an entire wall in my office to be my new chalk board inspiration wall.


Start with flat-finish latex paint in any shade. For small areas,  mix 1 cup at a time. Pour 1 cup of paint into a container. Add 2 tablespoons of unsanded tile grout. Mix with a paint stirrer, carefully breaking up clumps. Apply paint with a roller or a sponge paintbrush to a primed or painted surface. Work in small sections, going over the same spot several times to ensure full, even coverage. Let dry.  Smooth area with 150-grit sandpaper, and wipe off dust. To condition: Rub the side of a piece of chalk over entire surface. Wipe away residue with a barely damp sponge.


1/2/3/4/5/6

HOW TO STYLE YOUR SOFA


One of my design pet peeves is when a homeowner buys a sofa, and it sits in their living room with the matching pillows that it came with. But I can sympathize, you take time selecting the perfect piece at the right price, and you have been convinced that that is how it is "supposed to look." It is hard fore many of my clients to see that it is okay to replace those pillows with some new ones that coordinate with their sofa and the decor in the room. In fact, many times you can just take off the cover that came with the pillow and purchase/make a new one. So here are a few tips on how to style your sofa.


Select a matching pair of pillows that are either 24 or 22 inches square to place on the far right and left of the sofa, I like to call these the "anchor" pillows.  Work your way to the center with a set of slightly smaller square pillows.

Mix and match your fabrics, sofa upholstery and pillow fabrics should never be the same. If you have a solid fabric on your sofa use a print on your anchor pillows to ground other pillows, and vice versa. Limit patterned fabrics to one set of pillows per sofa.

I don't like to have more than 5 pillows on a sofa, I think it just gets too cluttered after that. If you want to add an odd shaped pillow to the mix to keep the look from feeling too symmetrical, include a smaller, rectangular pillow made from a third fabric that's different but coordinates.

I like to use down inserts rather than polyester inserts. They are more comfortable and better looking. If allergies are a problem, try high-quality, hypoallergenic down.When you fluff the pillows give the top a gentle karate chop, just to get the slight "v" shape. (its hard to do this with polyester filled pillows)

If you stick to those simple rules you will be headed in the right direction, and take it from me- as long as your sofa doesn't have built in cup holders, you'll be miles ahead of the curve. 

Here are a few of the rule breakers and why its okay:


In this sofa they stacked the tallest pillows in the middle and the shortest on the edge. Its okay because the pillows on the ends are the same size and they alternated the color and patterned pillows.
In this room they left matching pillows on the sofa. In this example they placed a matching pillow next to a solid pillow to vary the layers. If you want to keep your matching pillows, try layering them on the inside and using a contrasting pillow as the anchor. If your matching sofa pillows coordinate with other upholstered pieces in the room try putting them on those pieces.

X-DESK TUTORIAL

Monday I posted about all the DIY projects I worked on over the weekend, and as promised here is the tutorial for my desk. I want to preface this post by saying, I am not a furniture designer, or builder so this was a HUGE learning experience. The plans modified more than once due to miscalculations and plywood that wasn't, well, straight... But I am pleased with the overall completed design and I saved myself about $150 which you can't complain about! This post is really long and explanative, (pretty sure explainative isn't a word) so if you aren't going to build a desk, please enjoy the photos.


If you are going to build one yourself there are a few things you want to figure out, like, how tall do you want your desk to be, how deep and wide should it be, and if you need a drawer.

My desk is 32" high, 24" deep and 48" wide. (Because the lumber store sold 2'x 4' sheets of plywood) I had to use the computer to determine the angles at which my desk's legs met. I came out with a good even 100 and 80 degrees. (you can see this in the drawings below where the dimensions are notated) I then printed out a full size template of the angle so we could mark the 2x4s to cut for the legs.


 Using the dimensions above, which I drew up in AutoCAD, We measured, marked and cut the wood for the legs. We set the circular saw to 40 degrees to give them the right angle to sit at, then proceeded to use our template to mark them for the center cuts. To make an X shape out of the 2 separate pieces, you have to notch out 1/2 of each piece of wood so they slide together. (If this doesn't make sense scroll down and look at the pictures, then come back)


Once everything was marked on the legs we set the height of the saw to be 1/2 the depth of the 2x4. (1.75") And John just kept running the saw back and forth under the wood until he had notched out the perfect hole. See below:


Once all of the holes are notched out, you can glue and screw the legs together. I am not going to lie, there were 3 "practice legs that we made with scraps before we cut the good wood. The legs are the hardest part of this project and if you aren't good at math, find someone who is. (We had help from a structural engineer and it was still hard). You can do it!


Once the glue is dry, fill the screw holes and joints with wood filler. Let the wood filler dry, and sand. 


Once the legs were set we started on the top. The top is just a glorified box that opens in the front, where the drawer pulls out. We ended up buying 22" drawer slides that mount to the sides of the drawer, and the inside of the box. (You have to leave at least 1/2 an inch of space to allow for the instillation of the slides.)


The above image is John tacking the bottom of the drawer onto the frame. We learned this the hard way, because we aren't carpenters, but you have to leave enough space above the drawer to remove it once the desk is built. So my drawer is permanently installed, it cant be removed, oops! And honestly, my motto throughout the entire week long experience was "It's okay, no one will notice that," or "I will just fill it with wood filler!" So we built the box, without the top, built the drawer, and then screwed the top on once the drawer was neatly inside.


Installing the drawer glides is easy if you read the directions that come with them. The wind blew the directions away, so we had to figure it out on our own. You should be fine if you install the glides 1/8 of an inch in from the edge of the drawer and the interior of the box.


Once we had the top pieces assembled we screwed the legs onto a "base" piece made from a 1x6 that we trimmed down to 4" in width. You could leave out the base piece, but I felt like it looked like a picnic table without it. Then we screwed the legs to the bottom of our box.


I had originally intended on having the drawer slide into and be inset inside the box, so that the drawer front was mounted inside. But as it turned out the bottom piece of plywood was warped just enough that the drawer had a huge gap underneath it. It looked so dumb that I wanted to quit and walk away. John convinced me we could mount the drawer front on the outside of the frame, so it would hide the warping bottom. So I compromised on my original design, I liked having the drawer inside because it gave it the look of British campaign furniture. And I knew that mounting the drawer on the outside would make the desk look more modern, but at that point I knew I could select some more traditional knobs for the drawer and possibly make it okay.


Once you get to this point all you have to do is fill anything that bugs you with wood filler, sand, and paint. I painted on 2 coats of kilz 2 primer, and then sprayed on a final coat of gloss white. Let it dry fully before you apply your next coats so you don't get a sticky/tacky finish. Good Luck! If you want detailed plans of this design leave a comment. If I have enough requests I will work on getting a PDF available for print out.