HOME ABOUTINTERIORSRECIPESBEAUTYPRINTABLESTUTORIALS SHOPFEATURED
Showing posts with label thrifting. Show all posts

DIY PINBOARD


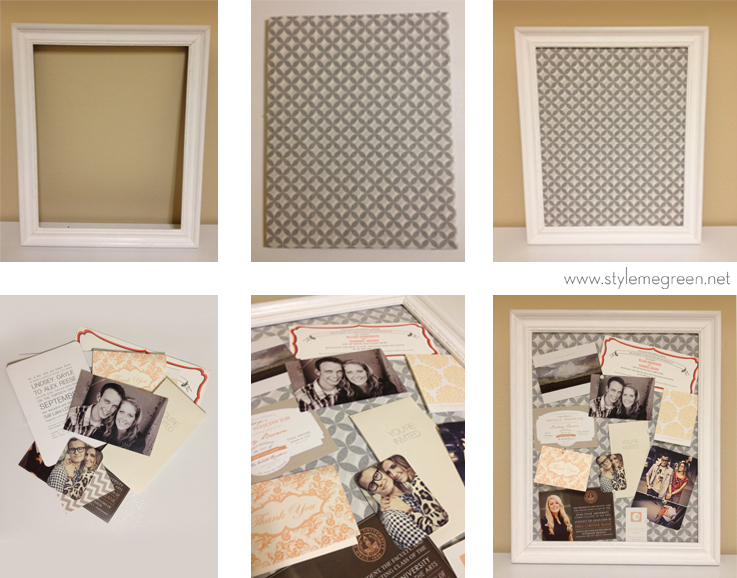
I have a box in my office filled with notes and cards that I like to keep around for inspiration. I find it helpful if I am stumped on the wording to a wedding announcement, need a reminder on a friend's child's birth date, or need an idea for a color palette. You'd be surprised how many small things you can find inspiration in. But first you have to get them out of the box. I have been meaning to make a pin board for a while and finally got around to it on Sunday, while watching the latest Mad Men. It really is that easy, it took about 20 min, excluding painting the frame. So here's how:


Find a great frame with character, I loved this one because it had some great carved details in it. I picked it up a few years ago at good will and it had been waiting for new life. I painted it white with some primer I had on hand but any type of paint will do on wood- prime before you paint plastic or metal.

Then I used an exacto knife to cut a piece of foam core to fit the opening. I had a few fabric remnants on hand and selected a black and white pattern for the inside. It had too much contrast for my taste- so I ended up using the back side of the fabric, which is grey and white.

Just pop the foam core into place. Arrange some cards and letters and pin them on! That's it, I told you so easy. And you can do it on a large or small scale. If you had a large frame you could duct tape your foam boards together to create a larger inspiration palette. I already know I'll be switching out the fabric panel all the time.


DIY BIB NECKLACE


I found this amazing sweater at a thrift store this weekend for $3.00. John thought I bought it to actually wear and kept complimenting it, as though I might need some confidence to wear it- HA! But, as soon as I saw it I knew it was destined for a new life as a bib necklace. It was so simple a child could do it. Here's how I pulled it off: 


1. I used a seam ripper to carefully pick the threads that held the "bib" to the sweater.
2. I held the necklace up to my chest to decide where to place the ribbon.
3. Carefully stitch on the ribbon to the back of your bib, hiding the threads on the front.
4. I used 3/4" grosgrain ribbon, and left the ends about 16" long.


DIY HEADBOARD


Once the snow melted, about mid May for us, I decided I needed to finish this crazy DIY project that was hanging over my head, literally. I inherited this great solid wood door when my parents replaced the door to their shed. I knew I wanted to turn it into a headboard, but it was in rough shape. We started by scraping off all the loose paint, if you do this at home be sure to wear a mask in case you are dealing with lead paint.


Step two was cutting off the bottom of the door. It was about 4 inches longer than the rest of the frame, and once it was cut, it would be the perfect size for a king-sized bed. Keep in mind for a headboard you want about 2-4 inches larger than your actual mattress, a lot of it comes down to personal preference- but once your bedding is on you don't want the headboard to look like it shrunk. I ended up making mine 2" wider than the mattress.


Once the door was cut down to the proper size John left me alone to do the rest by myself. Apparently no one thought I could use the circular saw unsupervised... #blondegirlproblems.  I went to town filling the cracks and dents with wood filler. When it was dry I sanded it down with an electric circular sander. (Way too much work for a plain sanding block.) And then I refilled any holes that persisted, and repeated sanding.


Because I was dealing with raw wood I went ahead and used KILZ latex primer. I painted it on with a foam brush. But for efficiency's sake, and because I am the most impatient DIYer ever,  I sprayed on the second coat of primer, which, saved me about an hour of work time and an hour of drying time. I painted it with Benjamin Moore's Misted Green, it took two coats to cover the head board and the legs.

Once everything had cured I screwed on the legs with metal plates. (On the back I put 2 screws in the leg and 2 screws on the headboard) On the front I put one screw into the headboard, and 3 in the leg.


I made mine with 3 legs so the middle was well supported, and I made the legs 3" higher than the top of my mattress. I have 12' ceilings, so I had to make up for that with a tall headboard- but you can only tell that the headboard rises above the mattress when the pillows and bedding are removed. If you don't have any antique doors laying around, I'm sure with some careful mitering you could also make this style of headboard with a sheet of plywood and some 2x4s!


 If you like the fern botanicals above my headboard you can print them here. Have you tried to make your own headboards? I'd love to see.


4th OF JULY ANTIQUING

Over the holiday and weekend we hit up all the great antique shows going on in our Valley. Here are some of the highlights. It was super hot this year so we kept it short and simple, but I'm still kicking myself for not snatching up some cool treasures... 


These bird feeders were the coolest DIY thing I found this year. They are made from old lamp parts and plates. Would be so fun to make.


This guy had so many antlers that he was basically giving them away. I had to restrain myself because I have been wanting to dip paint some gold for a while now.


I thought these chairs were fun.


This settee was $800.00 it had been reupholstered in a heavy white linen and the wood had been striped and didn't have a new finish. I kept thinking for $800 you could have made this a lot more fun! 


I had my eye on those old wooden crates, this vendor also had some great vintage dresses and aprons.


We get the sun motif around here a lot, but I was sort of in love with these hand painted tiles, I think theywould make great trivets, or a tray in the bathroom (which is what my mom got one for) 


Don't you love that they left some of the original metal unpainted on these bed frames?


I thought these wire trays were cool, but they were so big I couldn't figure out where I would use them in my home.


I am still mad at myself for not buying these great old suitcases.

This was one of my favorite booths, these gals were from Salt Lake and they had so many DIYed pieces, and great salvaged items.


This glass was all a great purple color and the guy at this booth told me it was exposed to UV light and because it had a specific chemical in it, it turns the glass purple. (I don't remember what chemical, all you scientists out there help a girl out)


This booth was full of great ski memorabilia and fun rustic finds. The guy was from Colorado and he made this table himself. I loved how he paired it with these great red metal chairs. It was so hot though, I didn't dare sit in them!


I thought this cart would have made a great coffee table, and it had so much more character than the ones at Restoration Hardware. I don't know what these buckets are used for- my best guess was picking fruit or smashing grapes.


This booth had so many awesome Eastern textiles and art pieces. I was a little obsessed with this massive horse, they had two of them!

INDEPENDENCE DAY ENTERTAINING

The 4th is nearing, so to start off this lovely week I thought I’d share some tips on hosting the best eco-conscious backyard BBQ - patriotic style.

Invites: e-vites and digital invitations are the best way to go- no paper. If you want it to be more personal then create one handmade invitation and scan it, or if you have the skills use a computer program to create a one-of-a-kind invite.

Dinnerware: Each year Americans toss out enough paper and plastic cups, forks, and spoons to circle the equator 300 times, (that's a lot of times) so do the earth a favor and use recycled dinnerware, or something that you can re-use. Recycline makes recycled, tough dinnerware with a casual look. Perfect for a back-yard soiree, and its intended to be reused.

Linens: If you don't already have linens, the best place to find an eco friendly version is at a thrift store or antique shop. Even a large white bed sheet can cover the table in a pinch. Bandanas, or fabric remnants make great placemats,  or tie them with some twine for napkins- and they can be used afterward. If you are short on tables and chairs- picnic blankets spread out on the lawn make a great "kid's table" or offer a more casual dining experience.


Centerpieces/Decor: The best summer centerpieces can be found in your own backyard (or flower shop) wild flowers in glass jars make a beautiful focal points. Or let the food do the work for you- vintage dishes filled with blueberries or cherries would make great table decor. I saw the idea below on Pinterest, and I bow to the genius who thought of stenciling their lawn with household flour!


Food: If you don't plan on tossing a few garden burgers on the grill, fruit offers a great vegetarian and vegan friendly option for guests. I like the idea of the fruit kabobs below. They are festive and healthy!


MEMORIAL DAY MAKEOVERS

Over the weekend I FINALLY finished some DIY projects that have been on my list for far too long. I found these tables at my favorite local thrift store. The first one I found about 5 months ago and it was perfect for John's nightstand. It sat neglected because I just wasn't sure what to do with it, and every time I asked John what he wanted he said I should just leave it, yeah right. I chose one of my favorite creamy whites, Nacre by Sherwin Williams. I loved the little brass knob, it was far too charming to replace, over all I think it turned out great. Now I just need to find some lamps


When I found this table I knew it was perfect for our deck. I have a soft spot for faux bamboo and this table was a steal at $20.00. For about a week it sat in my kitchen and I couldn't decide what color to paint it, black or white. I decided black. I primed it grey, and painted the legs when I realized it just wasn't right. So then I decided I would paint it a fun coral color. When they didn't have coral spray paint at Home Depot (they had pink and orange but no coral...) I made a snap call and went with green. But it was okay, because we both love it! A design compromise that was worth it.


PAINTING TIPS

I get a lot of questions from people asking me about how to paint furniture. I am no expert, but I have made so many mistakes, and had some small successes. So to the best of my experience here are my tips for an even profession look to DIY painted furniture.

Sometimes I use spray paint for projects and other times I use canned paints. Most furniture pieces that have a veneer, are metal, or plastic I use spray paint, because you can get a uniform finish that will stick. For wood that is unfinished or sanded down I like to use a brush and canned paint, because the wood is going to "absorb" the paint and if you do it right you can get a pretty smooth finish. My favorite spray paint brands are Krylon and Rustoleum. And my go to interior latex is Benjamin Moore's Natura line because it has no VOCs. I use Kilz primer because that's what my mom taught me and you don't mess with that advice.


METAL:
For metal I only prime if I have rusty, exposed spots. I use Rustoleum's 2x primer because its good for metal wood and plastic, if priming is necessary. Once I have a good base of primer I usually use Krylon if I want bright colors, they have lots of great colors. If I'm going more subdued I stick with Rustoleum that have good cream, white, and grey tones that I like. Sometimes it all depends on whateve brand the hardware store carries, you can;t go wrong with either of those options.

The key to painting metal is scuffing up the surface with steel wool or sand paper to remove debris and rust. And allowing adequate drying time. I can't tell you how many botched paint jobs I've seen because someone didn't read the back of the can. Spray paint will look awful if you: hold the can too close to the object, paint in extreme temperatures, and don't allow for proper drying time. I maybe know this from experience, maybe...
 
VENEER:
Veneers are tricky and you have to feel them out in their own situations. In most cases I skip sanding all together with this type of furniture. I HATE sanding. So I avoid it when/if possible. I try to give it a few light coats of primer before my final coat and I rarely have problems. The biggest issue I have run into is with flat and satin spray paint. If your final coat isn't even, you can get a streaky-stripey looking finish, not in color but in the sheen of the paint. I have found that this is best avoided when the can of paint is full. When it starts to run out you can't get even coverage, even though it appears to be coming out even- its not. Do your final coats with a full/almost full can of paint. And make sure you aren't painting in direct sunlight, or on a hot day- it can make the paint sticky and you won't get an even coat.
I am sitting in the direct sunlight, don't paint my top or my finish will be uneven...


NATURAL WOOD:
 You should sand down all natural wood, and prime it first. I like to lightly brush on my primer and lightly sand in between coats, being sure I follow the grain of the wood. I prefer synthetic bristle brushes and foam brushes, because you get less brush marks in the final coat. Sometimes I'll even use a foam roller, just steer clear of  the natural bristle brushes, they loose bristles so easily, they do not last as long, and they leave streaks and bristles behind, you are basically throwing money away on these. I used this technique on my dining table and it came out looking amazing. I get compliments on it all the time, its hard to believe it was a $10 thrift find.

Even sheen from painting with a synthetic brush.

PERFECT PAINT LINE:
My secret to the perfect paint line with no bleeding or drips is to tape off the area you want to paint and then paint a base coat of the background color. On this nightstand I painted my first layer of stripe in blue, then 2 coats of white. if the paint is going to bleed the only color that will bleed is the blue. It acts like sealed barrier, now only the un-taped parts with be white, and you end up with a crisp, clean paint line. 


RECORD PLAYER INTO TV STAND


I inherited this record cabinet after all of the speakers and mechanics were stripped from the interior. The doors were all fixed and the only interior access was lifting the top center to a compartment to reveal where the actual record player was hidden.  The drawers are just a decorative fascia, but the doors could actually be removed. I had been looking for a media cabinet and nothing else came close to the right size for the television. So, with a little creativity and hardware we were able to turn this baby into an actual working cabinet, here's how we did it.


1. I removed all of the doors and unscrewed all of the hardware, the door panels had metal and fabric stapled in the insets. We had to carefully remove all of the staples to get the criss-crossed metal out of the insets. I HATE sanding- so I never do it unless it is absolutely necessary. In this case the surface was fine to just prime and paint. So I just had to wipe down the surfaces with a damp cloth.
2. I used Rustoleum's 2x primer and their American Accents Ivory Satin. I painted 2 coats of primer over all of the doors and frame of the cabinet, followed by 2 coats of satin Ivory paint. Once the paint was dry I screwed in the new hardware and stapled a simple monochromatic paisley to the inside of the door panels.

3. John installed hinges on the right and left side doors so we could store dvds and all of our electronics. We installed shelves inside those compartments as well with some simple "L" brackets. I left the inside unfinished because only we ever see it and it didn't justify wasting the resources.