If you are going to build one yourself there are a few things you want to figure out, like, how tall do you want your desk to be, how deep and wide should it be, and if you need a drawer.
My desk is 32" high, 24" deep and 48" wide. (Because the lumber store sold 2'x 4' sheets of plywood) I had to use the computer to determine the angles at which my desk's legs met. I came out with a good even 100 and 80 degrees. (you can see this in the drawings below where the dimensions are notated) I then printed out a full size template of the angle so we could mark the 2x4s to cut for the legs.
Using the dimensions above, which I drew up in AutoCAD, We measured, marked and cut the wood for the legs. We set the circular saw to 40 degrees to give them the right angle to sit at, then proceeded to use our template to mark them for the center cuts. To make an X shape out of the 2 separate pieces, you have to notch out 1/2 of each piece of wood so they slide together. (If this doesn't make sense scroll down and look at the pictures, then come back)
Once everything was marked on the legs we set the height of the saw to be 1/2 the depth of the 2x4. (1.75") And John just kept running the saw back and forth under the wood until he had notched out the perfect hole. See below:
Once all of the holes are notched out, you can glue and screw the legs together. I am not going to lie, there were 3 "practice legs that we made with scraps before we cut the good wood. The legs are the hardest part of this project and if you aren't good at math, find someone who is. (We had help from a structural engineer and it was still hard). You can do it!
Once the glue is dry, fill the screw holes and joints with wood filler. Let the wood filler dry, and sand.
The above image is John tacking the bottom of the drawer onto the frame. We learned this the hard way, because we aren't carpenters, but you have to leave enough space above the drawer to remove it once the desk is built. So my drawer is permanently installed, it cant be removed, oops! And honestly, my motto throughout the entire week long experience was "It's okay, no one will notice that," or "I will just fill it with wood filler!" So we built the box, without the top, built the drawer, and then screwed the top on once the drawer was neatly inside.
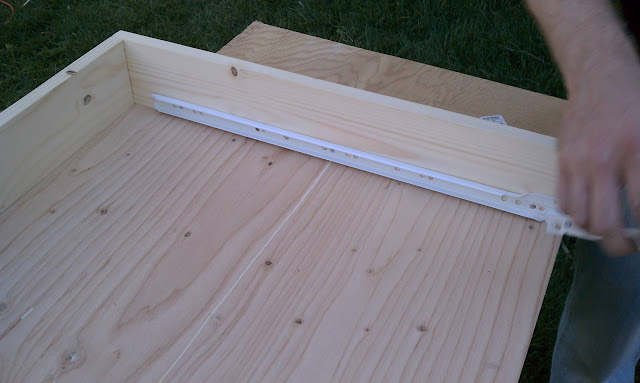
Installing the drawer glides is easy if you read the directions that come with them. The wind blew the directions away, so we had to figure it out on our own. You should be fine if you install the glides 1/8 of an inch in from the edge of the drawer and the interior of the box.
Once we had the top pieces assembled we screwed the legs onto a "base" piece made from a 1x6 that we trimmed down to 4" in width. You could leave out the base piece, but I felt like it looked like a picnic table without it. Then we screwed the legs to the bottom of our box.
I had originally intended on having the drawer slide into and be inset inside the box, so that the drawer front was mounted inside. But as it turned out the bottom piece of plywood was warped just enough that the drawer had a huge gap underneath it. It looked so dumb that I wanted to quit and walk away. John convinced me we could mount the drawer front on the outside of the frame, so it would hide the warping bottom. So I compromised on my original design, I liked having the drawer inside because it gave it the look of British campaign furniture. And I knew that mounting the drawer on the outside would make the desk look more modern, but at that point I knew I could select some more traditional knobs for the drawer and possibly make it okay.
Once you get to this point all you have to do is fill anything that bugs you with wood filler, sand, and paint. I painted on 2 coats of kilz 2 primer, and then sprayed on a final coat of gloss white. Let it dry fully before you apply your next coats so you don't get a sticky/tacky finish. Good Luck! If you want detailed plans of this design leave a comment. If I have enough requests I will work on getting a PDF available for print out.


2 comments:
Ah, that is one lovely desk and the tutorial was really good too. I may have to keep the design in mind because this would work well for me.
Thanks for posting the tutorial.
Awesome desk! Would make a gorgeous dressing table.
Post a Comment