HOME ABOUTINTERIORSRECIPESBEAUTYPRINTABLESTUTORIALS SHOPFEATURED

AFFORDABLE ART

Cultivating an art collection can be expensive and take years to perfect. When you are selecting pieces for your home you should consider your decor, and choose pieces that you love that will last the test of time. You don't want to rush it. One day when I was in the craft store buying spray glue for a school project I overheard a young married couple selection posters and art prints. The wife would say things like, "Okay, now we need a three foot poster for above the couch." Then the husband would walk around an pick out some things and add it to their pile. They were literally checking off the pieces as they went. There was no rhyme or reason to what they were choosing, just pieces that they thought looked okay, and fit their empty wall spaces. A rule of thumb that I like to apply when selecting art is, don't purchase art from the same place that sells posters of babies dressed up like flowers.


I love simple landscapes, vintage ad prints, and colorful abstractions. I find that I can only afford to purchase pieces for my home about 2 or 3 times a year depending on their price and size. To get around the hefty price tag that comes with art investment, I have framed all sorts of things from art show postcards to vintage playing cards. Here are a few ideas to get you going on a great collection of your own. I generally start with a simple wooden frame and most pieces look great framed in black, white, or gold with simple white mats. The piece above is a large sheet of marble paper, framed in an ikea frame. Wallpaper scraps, wrapping paper, or even the front page of a news paper could make a great statement.


I love this idea from the blog, Young House Love. They took paint chips and arranged them creating an ombre effect. This is such a versatile idea, it can be done in any color scheme, or on any scale- large or small.


One of my friend's made this piece for her husband as a Valentine's gift. Finding inspirational quotes can be a great way to celebrate your family, or like this example keep you motivated. I bet he thinks of her every time he reads it.


Look no further than your garden for art ideas. Censational Girl took some fern leaves, pressed them between some wax paper, and in a matter of days had these great pieces. and they are so on trend for pennies. Almost anything that inspires you can be turned into art for your space.

X-DESK TUTORIAL

Monday I posted about all the DIY projects I worked on over the weekend, and as promised here is the tutorial for my desk. I want to preface this post by saying, I am not a furniture designer, or builder so this was a HUGE learning experience. The plans modified more than once due to miscalculations and plywood that wasn't, well, straight... But I am pleased with the overall completed design and I saved myself about $150 which you can't complain about! This post is really long and explanative, (pretty sure explainative isn't a word) so if you aren't going to build a desk, please enjoy the photos.


If you are going to build one yourself there are a few things you want to figure out, like, how tall do you want your desk to be, how deep and wide should it be, and if you need a drawer.

My desk is 32" high, 24" deep and 48" wide. (Because the lumber store sold 2'x 4' sheets of plywood) I had to use the computer to determine the angles at which my desk's legs met. I came out with a good even 100 and 80 degrees. (you can see this in the drawings below where the dimensions are notated) I then printed out a full size template of the angle so we could mark the 2x4s to cut for the legs.


 Using the dimensions above, which I drew up in AutoCAD, We measured, marked and cut the wood for the legs. We set the circular saw to 40 degrees to give them the right angle to sit at, then proceeded to use our template to mark them for the center cuts. To make an X shape out of the 2 separate pieces, you have to notch out 1/2 of each piece of wood so they slide together. (If this doesn't make sense scroll down and look at the pictures, then come back)


Once everything was marked on the legs we set the height of the saw to be 1/2 the depth of the 2x4. (1.75") And John just kept running the saw back and forth under the wood until he had notched out the perfect hole. See below:


Once all of the holes are notched out, you can glue and screw the legs together. I am not going to lie, there were 3 "practice legs that we made with scraps before we cut the good wood. The legs are the hardest part of this project and if you aren't good at math, find someone who is. (We had help from a structural engineer and it was still hard). You can do it!


Once the glue is dry, fill the screw holes and joints with wood filler. Let the wood filler dry, and sand. 


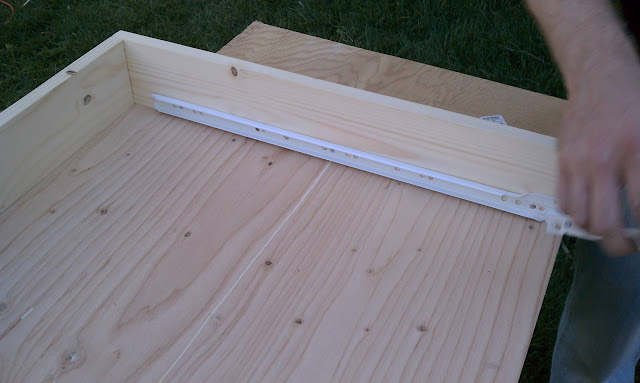
Once the legs were set we started on the top. The top is just a glorified box that opens in the front, where the drawer pulls out. We ended up buying 22" drawer slides that mount to the sides of the drawer, and the inside of the box. (You have to leave at least 1/2 an inch of space to allow for the instillation of the slides.)


The above image is John tacking the bottom of the drawer onto the frame. We learned this the hard way, because we aren't carpenters, but you have to leave enough space above the drawer to remove it once the desk is built. So my drawer is permanently installed, it cant be removed, oops! And honestly, my motto throughout the entire week long experience was "It's okay, no one will notice that," or "I will just fill it with wood filler!" So we built the box, without the top, built the drawer, and then screwed the top on once the drawer was neatly inside.


Installing the drawer glides is easy if you read the directions that come with them. The wind blew the directions away, so we had to figure it out on our own. You should be fine if you install the glides 1/8 of an inch in from the edge of the drawer and the interior of the box.


Once we had the top pieces assembled we screwed the legs onto a "base" piece made from a 1x6 that we trimmed down to 4" in width. You could leave out the base piece, but I felt like it looked like a picnic table without it. Then we screwed the legs to the bottom of our box.


I had originally intended on having the drawer slide into and be inset inside the box, so that the drawer front was mounted inside. But as it turned out the bottom piece of plywood was warped just enough that the drawer had a huge gap underneath it. It looked so dumb that I wanted to quit and walk away. John convinced me we could mount the drawer front on the outside of the frame, so it would hide the warping bottom. So I compromised on my original design, I liked having the drawer inside because it gave it the look of British campaign furniture. And I knew that mounting the drawer on the outside would make the desk look more modern, but at that point I knew I could select some more traditional knobs for the drawer and possibly make it okay.


Once you get to this point all you have to do is fill anything that bugs you with wood filler, sand, and paint. I painted on 2 coats of kilz 2 primer, and then sprayed on a final coat of gloss white. Let it dry fully before you apply your next coats so you don't get a sticky/tacky finish. Good Luck! If you want detailed plans of this design leave a comment. If I have enough requests I will work on getting a PDF available for print out.


DIY WEEKEND

It must have been the chill in the air I felt early in the week, because this weekend was crammed with do-it-yourself projects that have been piling up. Mostly painting- I knew that I couldn't do once it got too cold. We also stopped over at my parent's to help them paint their shed, we spent the entire weekend in painting clothes- no joke!

I finally finished the desk and got it all painted! He (I guess I assume furniture should take a masculine pronoun) still needs some hardware, but I haven't quite decided yet what to go with there. Check back Wednesday and I'll tell you how to build one yourself.


I just couldn't take the jade color of the master bedroom headboard anymore, so I re-painted it with Benjamin Moore's Misted Green. See the how-to here.


I repainted my blue nightstand to match John's. I hadn't intended on painting it but then I had to stare at his every day and realized I love that color. His is this beauty here.


And yes, the stump I carried 15 miles through blazing sun is still sitting there mocking me. Except this time it's in the family room, so it mocks on a daily basis. I may never finish that hot mess.


MUFFIN FOR ONE

 Have you ever wanted just one chocolate chip cookie, or just one muffin? Then this post id for you! I found this great recipe for a single muffin on one of my favorite foodie blogs, Rabbit Food for My Bunny Teeth.
Not only is it tasty it has one of my all time favorite ingredients, Chobani yogurt! I basically eat one everyday for lunch, I could never be a true vegan because this yogurt exists, I wish I was kidding!


Ingredients:
4 Tbsp Chobani Vanilla Chocolate Chunk Greek Yogurt
3 Tbsp whole wheat flour
1 Tbsp liquid egg whites
1 Tbsp chia seeds
1/2 tsp pure vanilla extract
1/4 tsp or 1 packet of stevia
1/4 tsp baking powder

Directions:
Preheat oven to 375 degrees. Combine all ingredients and stir until well mixed. Pour the batter into a cupcake liner in a muffin tin. Bake for 15 minutes. Remove from oven and let cool for 5-10 minutes. Enjoy warm out of the oven.
Note: This recipe would also work great with other Chobani flavors such s cherry or blueberry where there are chunks of real fruit!


FACE IT: NATURAL FACIAL RECIPES

What's there not to love about by DIY face masks and facials? They are all natural, affordable, and super easy to whip up in your kitchen! I prefer a home facial to a store bought one because I know what I am getting. Do you ever read the shampoo bottle labels while sitting in the tub, or your food label while you are waiting for your microwave dinner to finish? I do- and half the time I was baffled by the ingredients, and I hate that. On a quest to discover new beauty techniques and homemade recipes I have stumbled upon these gems. Great recipes whose main ingredients gently nourish and heal skin. And I came across one similarity, of all the homemade masks out there, almost all of them include the essential components yogurt and honey. Here's why:


Yogurt contains high amounts of Lactic Acid, successful in refining pores, exfoliating the skin and stimulating collagen production. Unlike most other exfoliants that are harsh (like salylic acid), it gently cleans the skin and is suitable for even the most sensitive skin types. Plus, its thick and creamy texture lends a paste-like consistency that's great for a mask.


Honey is an all natural humectant, that means it holds in water to help keep the skin soft and moisturized. It also functions as an antimicrobial agent and can even be used to treat minor burns and cuts. An anti-irritant, it's also gentle enough for sensitive skin too. On top of it all, it makes a great binder for all the other ingredients in the mask, and it doesn't taste too bad either.

It doesn't matter what type of skin you have—there's a DIY recipe out there for you that incorporates both of these miracle foods.

DRY SKIN: Moisturizing Mask

- 2 tablespoons plain yogurt (the fattier the better)
- 1 tablespoon honey
- 1-2 tablespoons cooked & cooled oatmeal

Mix everything together until it forms a smooth paste. Spread over the face and leave on for 10-15 minutes. Wash off with a warm washcloth.

IRRITATED SKIN: Calming Mask

- ½ cup of plain yogurt
- 2 tablespoons Aloe Vera gel or juice
- 1 tablespoon honey
- ½ peeled cucumber
- A few drops of chamomile oil

Mix everything in a blender. Leave on face for 10-15 minutes.

BLEMISHES/ACNE: Aspirin Mask

- 5 uncoated aspirins
- 2-3 tablespoons plain yogurt
- 1 dollop honey

In a bowl, mix the honey into the yogurt. Drop the aspirins into the yogurt, and wait for them to dissolve (if you'd like you can also add water to help the tablets dissolve faster). Mix into a paste, and leave on the face for 10-20 minutes.

DULL SKIN: Cleansing Scrub

- 1 tablespoon honey
- 1 teaspoon plain yogurt
- 2 tablespoons finely ground almonds
- ½ teaspoon lemon juice

Mix everything together. Rub gently onto face for 1-2 minutes. Rinse off with warm water.

Note: Do not use if you have an allergy to one of the ingredients listed in the recipe. 

DIY BOOKENDS

I am up to my elbows in an office overhaul, and I have been sourcing great office accessories all week. I found a whole list of DIY projects that would be great storage and organization solutions. (Just what I need, to add more to the DIY queue). These bookends have made it to the top of my list, just what I need for my bookshelves. Happy DIY Weekend!


HOW TO EAT WITH THE SEASONS

I have been busy out in the garden harvesting all sorts of goodies, so today I wanted to share a list for eating and selecting foods with the seasons. Planning out your garden all year round, and selecting foods from the market that are in season will help you save money, and ensure that you are choosing foods that were grown closer to your home. It takes so much more money and energy to grow, harvest, and transport, a tomato to South Dakota in the middle of February than in late August. I know the winter food list isn't as appetizing as the summer list, but hey that's what canning is for right?

Update: for a great list on foods most contaminated by pesticides, see this post. 

FEELS LIKE FALL

Now that Labor Day has come and gone, I have begun to feel a slight sense of panic. We have begun the unofficial transition into fall, and although, I no longer have to be in distress over trying to make a pair of white jeans look good, I can't help but think about all the things I didn't get done. The desk I thought would end up taking one afternoon to build  is taking 3 days and it's still not finished. I played way too much to finish half of the DIY pile that is amassing in my office. That log stump I carried 10 miles from the beach to my car is staring at me, taunting me now, "You'll never figure out an easy way to make me be level." And around here you can expect that in about a week there will probably be 4 feet of snow out the window, so I can't give my heirloom tomatoes enough encouragement to ripen.

Despite all my trivial worries, I can't wait for white chicken chili, football games, and the leaves to change color. I do love fall, I love wearing boots and scarves, and eating freshly harvested veggies, there is something about it that just makes me wish we could freeze time. Please enjoy these images of Fall that I've been lusting over.
I could get behind this kind of avdenture
As long as the leaves don't fall on my car.


I was lucky enough to get Aaron Rodgers on my Fantasy Football team, so I had to represent!

This is my kind of camping, AKA GLAMping
Can this just be my life?